How to Build a Stunning Diecast Car Display Wall

This post covers the complete process of building a professional-grade diecast car display wall—from selecting the right shelving system to lighting, arrangement strategies, and protecting the collection from dust and UV damage. Whether the collection numbers twenty pieces or two thousand, a well-designed display wall transforms scattered models into a gallery-worthy exhibition that showcases the engineering artistry and historical significance of each piece.
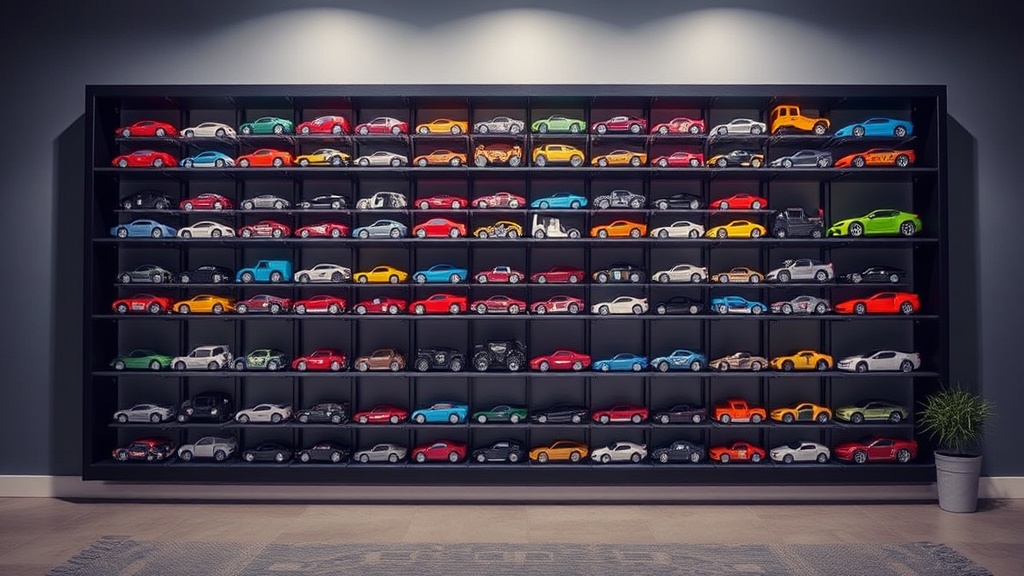
What Type of Shelving Works Best for Diecast Display Walls?
Floating shelves offer the cleanest aesthetic for diecast display walls. Unlike traditional bookcases with visible supports, floating shelves create uninterrupted sightlines across the collection. The CRL Z-Series glass shelving system supports up to 50 pounds per linear foot—more than sufficient for even the heaviest 1:18 scale models. For metal alternatives, the Elfa Décor system from The Container Store provides adjustable brackets in nickel, platinum, and graphite finishes that complement automotive-themed rooms.
Wood enthusiasts should consider the IKEA LACK floating shelf series. At 74 inches long and 10 inches deep, the LACK accommodates two rows of 1:18 scale models per shelf. The hidden bracket system mounts directly to wall studs, eliminating visible hardware. That said, the LACK's particleboard construction limits weight capacity to 33 pounds—fine for diecast, but inadequate for mixed media collections including resin or bronze pieces.
For modular flexibility, Acrylic riser systems from Amazon or eBay sellers allow tiered arrangements within each shelf bay. These transparent platforms improve rear-row models without blocking visibility—a technique borrowed from museum display design. The Combination of Carolina Custom Cages acrylic platforms with standard floating shelves creates professional depth staging at minimal cost.
How Should You Arrange Diecast Cars on a Display Wall?
Arrangement by scale maintains visual harmony. Group 1:18, 1:24, and 1:43 scale models separately rather than mixing sizes on the same shelf level. The eye processes uniform scale more easily, creating a cohesive museum aesthetic. Within each scale grouping, chronological arrangement tells stories—1950s American muscle flowing into 1960s European exotics, then 1970s Japanese classics.
Here's the thing about color arrangement: it photographs beautifully but requires careful execution. The rainbow spectrum approach—reds flowing into oranges, yellows into greens—creates Instagram-worthy walls but sacrifices historical context. A hybrid approach works better: group by manufacturer era first, then arrange by color within those chronological clusters. This satisfies both aesthetic and educational purposes.
"The best displays respect the engineering narrative. A 1961 Jaguar E-Type deserves proximity to the D-Type that preceded it—that lineage matters more than whether the paint happens to match the Ferrari beside it."
Spacing between models matters more than most collectors realize. Diecast vehicles need breathing room—crowding diminishes individual impact. Aim for 1.5 to 2 inches between models on the same shelf level. For 1:18 scale cars, this separation prevents accidental contact during removal and allows each casting's details to command attention. The catch? Wall space becomes the limiting factor. A collection of fifty 1:18 scale models requires roughly 25 linear feet of shelving when properly spaced.
Vertical spacing deserves equal attention. Standard 12-inch shelf heights accommodate most 1:18 scale models comfortably, but racing haulers, transport trucks, and oversized construction equipment need 18-24 inches. Planning shelf spacing around the largest anticipated acquisition prevents costly reconfigurations later. Elfa's adjustable bracket system allows 1-inch height increments—ideal for evolving collections.
Manufacturer Grouping Strategies
Brand-specific displays reward deep collectors. A wall dedicated entirely to AutoArt pieces—or MINICHAMPS Formula 1 cars—creates curatorial focus that general mixed-brand arrangements lack. The consistency of casting quality, wheel design, and base styling across single-manufacturer collections produces visual rhythm.
For comprehensive collections, manufacturer grouping by nationality tells automotive history effectively:
- German precision: AUTOart, Minichamps, Norev
- Italian passion: BBR Models, Looksmart, MR Collection
- Japanese craftsmanship: Kyosho, Tomica Limited Vintage, Ebbro
- American heritage: Danbury Mint, Franklin Mint (vintage), ACME Trading Company
What Lighting Brings Out the Best in Diecast Displays?
LED strip lighting transforms adequate displays into stunning ones. The Philips Hue Lightstrip Plus offers tunable white temperatures from 2000K (warm amber) to 6500K (daylight), allowing collectors to match lighting to paint finishes. Metallic blues and silvers pop under cooler temperatures; classic reds and burgundies warm beautifully under 3000K illumination.
Placement matters. Top-down lighting creates harsh shadows and obscures hood details. The optimal position: LED strips mounted on the shelf above each display level, facing backward at a 45-degree angle. This "grazing" light skims across hoods and rooflines, highlighting casting details and creating subtle shadows that add dimension.
| Lighting Type | Color Temperature | Best For | Approximate Cost |
|---|---|---|---|
| Philips Hue Lightstrip Plus | 2000K–6500K (tunable) | Full collection control, smart home integration | $80–100 per 6ft strip |
| Govee RGBIC Pro | 2700K–6500K + color | Budget-friendly tunable option | $25–35 per 16ft strip |
| Lithonia Lighting LED Strip | 4000K (neutral) | Simple installations, no dimming needed | $15–20 per 4ft fixture |
| GE Enbrighten Classic | 3000K (warm) | Vintage American muscle, brass-era vehicles | $30–40 per 12ft strip |
UV protection warrants serious attention. Diecast paint—particularly older formulations and certain metallics—fades under prolonged UV exposure. North-facing walls (in the Northern Hemisphere) receive minimal direct sunlight. For walls with window exposure, 3M UV-blocking window film filters 99% of harmful rays without darkening rooms. Worth noting: LED lighting produces negligible UV, making it safe for long-term display.
Accent lighting adds drama. Small MR16 LED spotlights aimed at signature pieces—perhaps that BBR Ferrari 250 GTO or the AutoArt Bugatti Chiron—create gallery-style focal points. These require additional wiring but reward the effort with museum-quality presentation. Wireless alternatives like the Brilliant Evolution LED Puck Lights offer battery-powered spotlighting without electrical work.
DIY Lighting Installation Tips
Hardwired installations demand electrical expertise—consult a licensed electrician for in-wall wiring. For simpler approaches, outlet-powered LED strips with concealed cable management achieve professional results. D-Line cable raceways in white or paintable finishes hide power cords running down wall corners.
Motion-activated lighting extends LED lifespan and reduces energy costs. Lutron Maestro motion sensors integrate with existing switches, illuminating the display only when the room is occupied. The components cost roughly $25—negligible compared to the collection's value and the electricity saved over years of operation.
How Do You Protect Diecast Cars from Dust and Damage?
Acrylic display cases represent the gold standard for protection. Grandpa's Cabinets produces custom acrylic cases specifically sized for 1:18, 1:24, and 1:43 scale models—each featuring mirrored bases that reflect undercarriage details. The cases run $15–40 per unit depending on scale, a modest investment for high-value castings.
That said, enclosed cases aren't always practical for large collections. Open shelving with regular maintenance offers accessibility that sealed cases sacrifice. The compromise: display daily drivers (frequently handled pieces) on open shelves while housing investment-grade models—limited editions, signed pieces, or vintage rarities—in protective cases.
Dust management requires discipline. Microfiber dusting wands like the OXO Good Grips Under Appliance Duster reach behind rows of models without moving them. Weekly light dusting prevents buildup; neglected dust becomes grime requiring careful cleaning with cotton swabs and distilled water. For compressed air cleaning, the DataVac Electric Duster outperforms canned air—no moisture, no propellant residue, unlimited reuse.
Environmental Control Considerations
Temperature and humidity affect diecast longevity. Ideal conditions mirror museum standards: 65–70°F with 45–55% relative humidity. Basements often run too humid; attics too hot. Eva-dry renewable dehumidifiers ($20–30) protect shelf-mounted collections in problematic spaces without electricity.
Rubber tires degrade over decades—a reality collectors of vintage 1990s and earlier pieces face. Silica gel packets in enclosed cases slow this process by maintaining low humidity. Replace or recharge them quarterly for maximum effectiveness.
What Wall Mounting Hardware Handles Heavy Diecast Loads?
Stud mounting isn't optional for loaded display walls. Drywall anchors—even heavy-duty toggle bolts—eventually fail under dynamic loads (removing and replacing models creates subtle vibration). Locate studs with a quality stud finder like the Franklin Sensors ProSensor 710, then lag-bolt shelving brackets directly into solid wood.
Concrete and brick walls offer superior load-bearing capacity. Tapcon screws or wedge anchors secure shelving to masonry with pull-out ratings exceeding 500 pounds per fastener. For collections exceeding 100 pounds per shelf section, this structural security provides peace of mind.
Weight calculations prevent disasters. A single 1:18 scale model averages 2–3 pounds; fifty models on a single shelf level creates 100–150 pounds of static load. Add dynamic loading (bumping, adjusting) and safety factors, and shelves need 300+ pound ratings. Always over-engineer—the cost of strong hardware pales against replacing a damaged collection.
Gallery systems offer flexibility for evolving collections. Arakawa Grip hanging systems—common in art galleries—support shelving via cables attached to ceiling or wall-mounted rails. These accommodate height adjustments without new holes and distribute loads across structural members rather than single points.
The final installation step often gets overlooked: leveling. Even slight shelf tilts cause models to drift toward edges over time. A quality 24-inch level and patience during initial mounting prevent this. For adjustable systems, verify level quarterly—houses settle, brackets loosen, and collections deserve stability.
Steps
- 1
Choose the Right Display Case or Shelving System
- 2
Install Proper Lighting to Highlight Your Models
- 3
Arrange Your Collection by Theme, Brand, or Era