Removing Oxidation and Surface Tarnish from Vintage Diecast Metal

This guide details the technical processes for identifying and removing oxidation and surface tarnish from vintage diecast metal components. You'll learn how to differentiate between surface-level patina and permanent structural corrosion, the specific chemical agents required for different metal alloys, and the precise mechanical steps to restore a model's luster without compromising the integrity of the original plating or paint.
What causes oxidation on vintage diecast models?
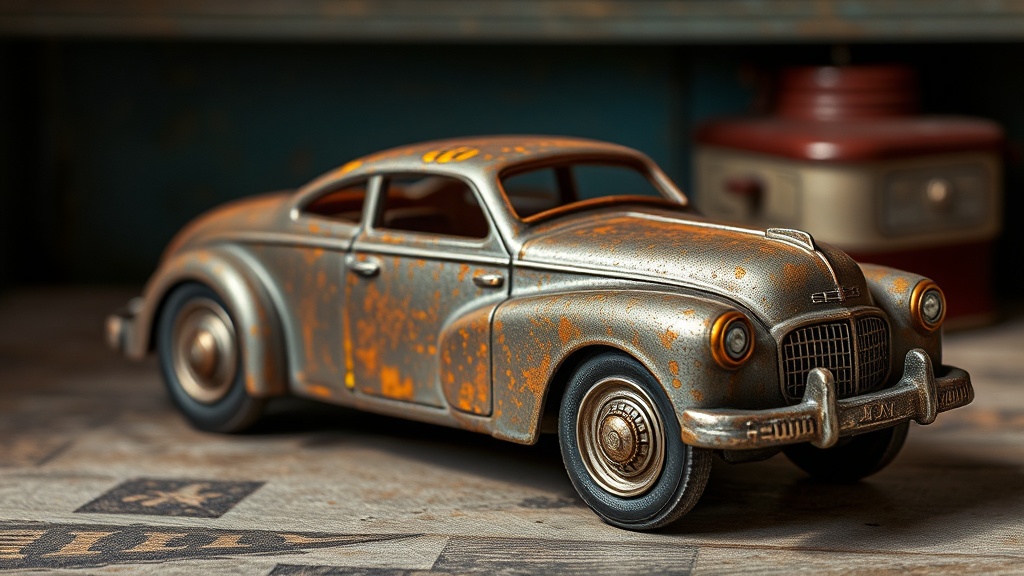
Oxidation occurs when the metal surfaces of your models react with oxygen, moisture, or acidic environments in the air. Most vintage diecast-collectible pieces are made from a zinc-based alloy often referred to as Zamak. While the paint provides a protective barrier, any micro-fractures or exposed metal edges can lead to chemical reactions. If you see a white, powdery substance or a dull, greyish film on the unpainted metal parts—like chassis or engine components—you're looking at oxidation.
Environmental factors play a huge role here. High humidity is the primary culprit. If you keep your collection in a basement or an attic with fluctuating temperatures, the moisture levels will accelerate the degradation of the metal. Even the oils from your skin can cause localized oxidation if you handle the models without care. (I've seen many collectors ruin a rare chassis just by leaving fingerprints on raw metal parts.)
There are two main types of surface degradation you'll encounter:
- Surface Tarnish: A thin, dull film that sits on top of the metal. It's usually a result of light oxidation and can be polished away.
- Zinc Rot (Diecast Rot): This is a more serious structural failure. It's a chemical reaction where the zinc alloy begins to break down, often causing the metal to swell or even crumble. If the metal is physically pitting or cracking, it's not just tarnish—it's structural failure.
Before you grab a polishing cloth, check the Zamak alloy properties to understand what you're working with. If the metal is crumbling, no amount of polishing will fix it; in fact, trying to polish it might make it worse.
How do I remove tarnish from metal diecast parts?
The best method for removing tarnish depends entirely on whether you are working on a painted surface or an exposed metal component like a chassis or an engine block. You must use a tiered approach, starting with the least aggressive method possible to avoid stripping the original finish.
For most collectors, I recommend a three-step progression: mild cleaning, chemical polishing, and mechanical refinement. Never jump straight to a heavy abrasive. You'll end up scarring the metal and destroying the value of the piece.
Step 1: The Mild Clean
Start with a solution of warm water and a very mild, pH-neutral soap. Use a soft-bristled toothbrush to gently lift any surface debris. This isn't "cleaning" so much as it is preparing the surface for the actual work. If the tarnish doesn't budge with a gentle scrub, move to step two.
Step 2: Chemical Polishing
If the metal is unpainted (like a chrome-plated engine or a raw metal chassis), use a specialized metal polish. Brands like Simichrome or Autosol are the industry standards for a reason. They contain very fine abrasives that work at a microscopic level to lift the oxidation. Apply a tiny amount to a cotton swab—not the model itself—and work in small, circular motions.
Wait a moment, then wipe it away with a clean microfiber cloth. You'll see the brightness return almost instantly. Just be careful around the edges where the metal meets the paint. You don't want to accidentally "bleach" the color out of a painted part by rubbing the polish too hard against it.
Step 3: Mechanical Refinement
For stubborn oxidation on larger, sturdier parts, you might need a more aggressive approach. A high-quality jeweler's rouge or a specialized metal polishing compound can work wonders. However, proceed with caution. Once you start using these, you are essentially "re-facing" the metal. This is a permanent change. If you're a purist who wants to maintain 100% original factory condition, stick to the milder methods.
| Method | Best For | Risk Level | Tools Needed |
|---|---|---|---|
| Soap & Water | Dust and light grime | Very Low | Mild soap, soft brush |
| Simichrome/Autosol | Dull chrome or unpainted metal | Moderate | Cotton swab, microfiber |
| Jeweler's Rouge | Heavy tarnish on unpainted parts | High | Polishing cloth |
Can I use household items like vinegar or baking soda?
You should generally avoid using household acids like vinegar or bases like baking soda on vintage diecast models. While these are common "DIY" suggestions online, they can be incredibly dangerous for delicate collectibles. Vinegar is an acid, and while it might dissolve the tarnish, it can also react with the underlying metal and cause even deeper corrosion later on. It's a temporary fix that often leads to long-term damage.
Baking soda is an abrasive. If you use it on a chrome-plated part, you're essentially sanding the chrome off. It's far too coarse for the delicate tolerances of a 1:18 or 1:64 scale model. If you've already used these methods and see a dulling of the finish, you'll need to use a more neutralizing agent to stabilize the surface.
If you find yourself in a situation where you've accidentally used a harsh chemical, don't panic. Rinse the part thoroughly with distilled water—not tap water, which contains minerals—and dry it immediately with compressed air. This removes any residual chemicals that could continue to react with the metal.
When you're dealing with high-value items, it's always better to be safe. If you're unsure about a part's stability, you might want to look at how to spot genuine vintage diecast models to ensure you aren't applying heavy-handed restoration techniques to a piece that should remain in its original, "as-found" state. Sometimes, the patina is part of the history.
One thing to keep in mind: if you are restoring a model to sell, be honest about the work you've done. There is a massive difference between "original condition" and "restored condition." A polished chassis is a beautiful thing, but if the buyer thinks they're getting a completely untouched, unpolished piece, you're going to have a problem.
The goal isn't just to make it shiny; it's to stabilize the metal so it doesn't degrade further. A well-polished part is a protected part. Once you've achieved the desired luster, consider applying a thin layer of microcrystalline wax—like Renaissance Wax—to the metal. This creates a physical barrier between the metal and the oxygen in the air, effectively halting future oxidation. It's the same method used by museums to preserve metal artifacts.
I've spent years looking at the microscopic grain of these alloys. The key is patience. If you rush the process, you'll leave streaks or, worse, micro-scratches that will catch the light and ruin the illusion of a perfect finish. Take your time. Work in small sections. The metal will respond much better to a gentle, repetitive motion than to a single, forceful scrub.
If you're worried about the long-term stability of your display, make sure your lighting isn't too hot. Heat can cause the air inside a display case to expand and contract, pulling moisture in and out of the seals. This "breathing" is a major driver of oxidation. A stable, temperature-controlled environment is your best defense against the need for restoration in the first place.
Steps
- 1
Identify the Oxidation Type
- 2
Prepare a Soft Microfiber Cloth
- 3
Apply a Non-Abrasive Cleaning Solution
- 4
Buff to a High Shine
- 5
Seal the Surface for Protection