Micro-Lighting Secrets: Elevating 1:18 Diecast Detail with LED Precision

A 1:18 scale 1967 Shelby GT500 sits under a standard halogen spotlight. To the untrained eye, the chrome bumpers glint perfectly. However, a closer inspection reveals a harsh, singular glare that flattens the sculptural depth of the rear quarters and leaves the interior cockpit in a cavernous, underexposed shadow. The light is too "hot," creating high-contrast hot spots on the paintwork while failing to illuminate the intricate texture of the dashboard or the grain of the simulated leather seats. This is the gap between a mere display and a true museum-grade presentation. Bridging this gap requires moving away from ambient room lighting and toward precision micro-LED integration.
The Engineering of Light: Why Standard Lighting Fails the Scale Model
In automotive manufacturing, lighting is used to define the "character lines" of a vehicle—the subtle creases along a door or the swell of a fender. In a 1:18 diecast model, the challenge is that the light source is often too large and too far away, resulting in a lack of directional definition. Standard desk lamps or overhead LEDs provide broad-spectrum illumination that washes out the micro-details like instrument cluster needles or seatbelt buckles. To achieve true fidelity, one must treat the light as a component of the car's geometry.
The primary issue is the inverse square law applied to miniature scales. As you move a light source closer to a small object, the intensity increases exponentially, often leading to "blown out" highlights on metallic or high-gloss finishes. To counteract this, we must utilize light sources that offer high control over beam angle and color temperature. We are not just looking for brightness; we are looking for specular control.
Selecting the Right Light Source: SMD vs. Through-Hole LEDs
When upgrading a display or a custom-built diorama, the choice of LED architecture is critical. There are two primary paths for the serious collector:
- Through-Hole LEDs: These are the traditional 3mm or 5mm bulbs. They are easy to solder but possess a high "point source" intensity, which can create harsh shadows. They are best used for high-impact, single-point illumination like a single headlight or a bright interior dome light.
- SMD (Surface Mount Device) LEDs: These are the tiny, rectangular chips found on modern electronics. They are incredibly low-profile and allow for much more sophisticated light placement. Because they are so small, you can hide them within the chassis or under a dashboard without altering the silhouette of the car.
For high-end 1:18 scale work, I recommend 0603 or 0805 SMD LEDs. Their footprint is negligible, allowing you to tuck them into the tight tolerances of a diecast engine bay or the narrow gap of a center console without requiring heavy structural modifications to the model.
The Technical Setup: Precision Tooling and Components
To implement micro-lighting, you must approach the task with the mindset of a technician. You are not just "adding lights"; you are integrating a circuit into a complex mechanical assembly. Before beginning, ensure your workspace is equipped with a high-quality digital microscope or a jeweler’s loupe. Precision at this scale is measured in fractions of a millimeter.
Essential Tool Kit for Micro-Lighting
- Fine-Tip Soldering Iron: A station with adjustable temperature control (such as a Hakko or Weller) is mandatory. You need to be able to work at low temperatures to avoid melting the plastic interior components or the delicate decals.
- 28 AWG or 30 AWG Magnet Wire: Standard copper wire is too thick and rigid. Magnet wire—enameled copper wire—is incredibly thin and flexible, making it ideal for routing through the tight gaps of a diecast chassis or around the steering column.
- Digital Multimeter: Essential for testing continuity and ensuring you haven't created a short circuit within the confined space of the model.
- Non-Conductive Tweezers: To manipulate tiny components without introducing static or accidental shorts.
Implementation Strategies: Interior vs. Exterior Illumination
Effective lighting must be categorized into two distinct systems: the Ambient Interior Glow and the Functional Exterior Highlight. Each requires a different approach to light diffusion and placement.
Illuminating the Cockpit: The Art of Diffusion
The greatest mistake in interior lighting is a visible "hot spot." If you place a single LED under the dashboard, you will see a bright dot on the carpet and a dark shadow everywhere else. To achieve a realistic glow, you must use diffusion materials.
I suggest using a small piece of frosted acrylic or even a tiny fragment of a high-quality white translucent plastic (like those found in some high-end figure packaging). By placing the LED behind this diffuser, the light spreads evenly, mimicking the way light bounces off a real car's dashboard. For a more advanced technique, use a "light pipe"—a thin strand of fiber optic cable—to carry light from a single, hidden LED to multiple points like the radio buttons and the instrument cluster. This allows you to keep the bulk of the electronics in the trunk or under the seats, preserving the model's structural integrity.
Exterior Highlights: Defining the Silhouette
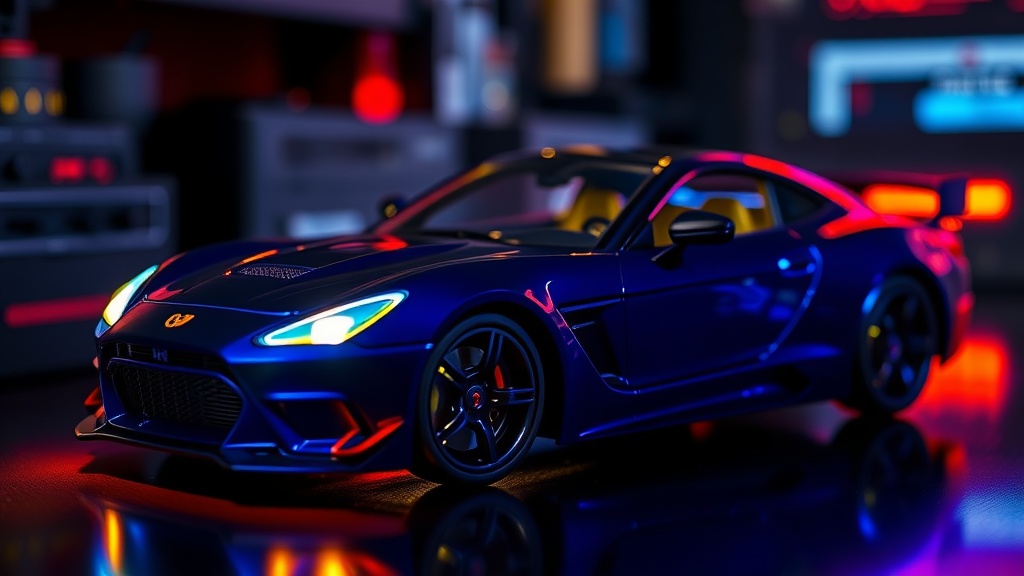
Exterior lighting should be used to accentuate the vehicle's engineering. If you are displaying a classic muscle car, the light should emphasize the aggressive stance and the chrome trim. If it is a modern supercar, the light should highlight the aerodynamic curves and the LED light strips.
When installing headlights or taillights, do not simply glue an LED into the housing. Instead, use a drop of clear UV resin over the LED. This serves two purposes: it secures the component in place and acts as a lens to focus the beam, creating that realistic "throw" of light seen in real-world automotive optics. This technique also adds a layer of depth that prevents the light from looking like a flat, unconvincing dot.
Managing Color Temperature and Light Consistency
A common pitfall in diecast displays is the mismatch of color temperatures. If your interior light is a "cool white" (6000K) but your exterior display light is a "warm white" (3000K), the model will look disjointed and artificial. The two light sources must work in harmony to create a cohesive scene.
For a vintage 1950s aesthetic, lean toward warmer, amber-toned LEDs (2700K - 3000K) to mimic the incandescent bulbs of that era. For a modern hypercar, a crisp, high-CRI (Color Rendering Index) white light (5000K - 6500K) will better highlight the metallic flake in the paint and the precision of the carbon fiber details. Always check your lighting settings in relation to your environment. As noted in our previous discussion on adjusting your display lighting for optimal viewing, the ambient light in your room will significantly impact how these micro-LEDs perform.
Safety and Longevity: Protecting the Diecast
Heat is the enemy of diecast collecting. Even though LEDs produce significantly less heat than incandescent bulbs, an improperly installed circuit can still generate enough thermal energy to warp plastic parts or degrade delicate paintwork over time.
"In precision engineering, the goal is not just to make a part function, but to ensure it functions within its intended thermal and physical tolerances. The same applies to your collection."
To ensure the longevity of your 1:18 scale masterpieces, always use current-limiting resistors in your circuits. An LED connected directly to a battery or power supply will eventually burn out or, worse, overheat. A simple 100-ohm or 220-ohm resistor placed in series with your LED will regulate the current, ensuring a steady, cool, and reliable light output that won't jeopardize the integrity of the model's interior.
Furthermore, when routing wires, never force them through tight gaps. Use a tiny amount of automotive-grade adhesive or a non-permanent mounting putty to secure wires. This allows for future maintenance or upgrades without the risk of permanent damage to the diecast casting or the paint finish.
Conclusion: The Final Inspection
Once your micro-lighting is installed, perform a final "stress test." Turn the lights on and observe the model from several angles—eye level, top-down, and side-profile. Look for unintended reflections on the windshield or the hood. If you see a harsh reflection of an LED, adjust your diffusion or slightly tilt the light source. A perfect display is one where the light seems to emanate from the car itself, rather than from an external source. By applying these technical principles, you transform a static piece of metal and plastic into a living, breathing piece of automotive history.